My Art Process
Below is a basic step-by-step of how I might work a typical illustration. I'm self taught and haven't had an art class since kindergarten, so I don't like to give art advice based on my lack of knowledge. As it has been requested, I will offer my process but I can't tell you this is the only, the best or even the right way of doing anything. I do, however, share some opinions.
I'm always open to suggestion and guidance, so if you have thoughts, feel free to share them with me!
Also, if you're curious about how I handle my commissions, my thoughts on art rejection, artistic inspiration, sites and processes I utilize, etc, I've got a few things posted here with more thoughts to come in the future: Mischi's Musings
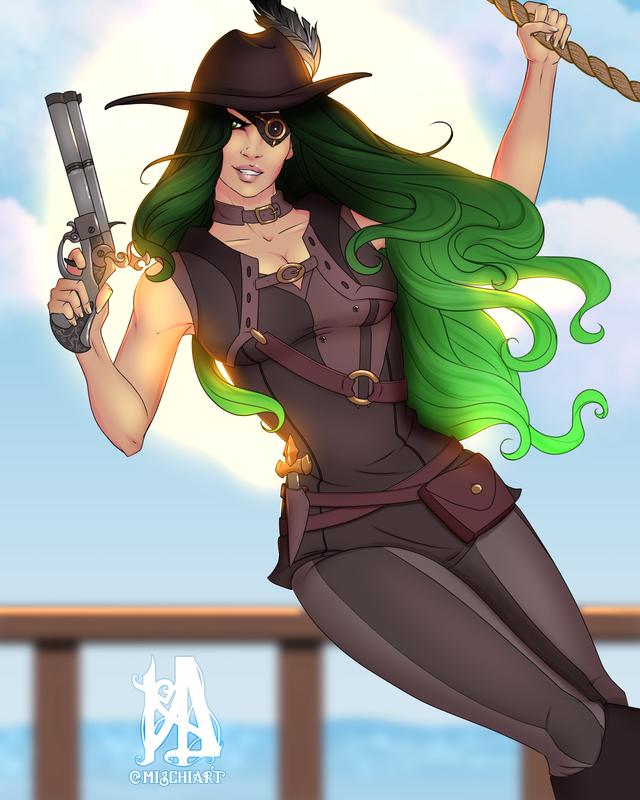
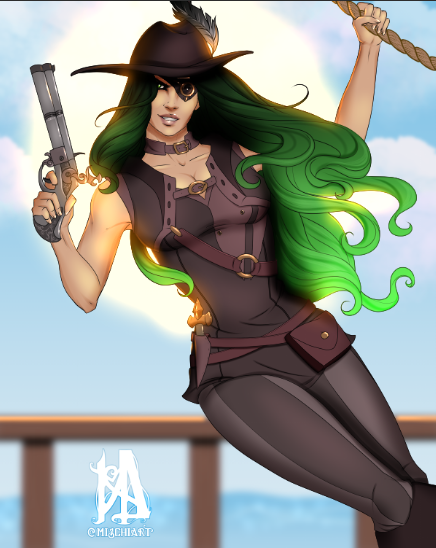
This is the awesome OC I had the privilege to draw recently and we'll use this piece as our example. I use a 19" Ugee digital tablet, Clip Studio Paint (CSP) & a Tabmate.
|
References
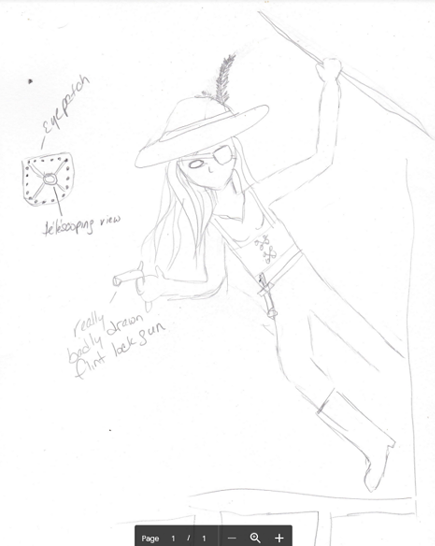
I had the opportunity to draw a super cool OC for a friend! And this was a wonderful reference provided by them of their vision for this piece. Couldn't ask for a better reference! I usually gather everything up and have them open on my screen for constant referencing. Having a dual monitor set up helps a lot with this. CSP allows you to detach and move viewing panels around which is also very helpful. |
|
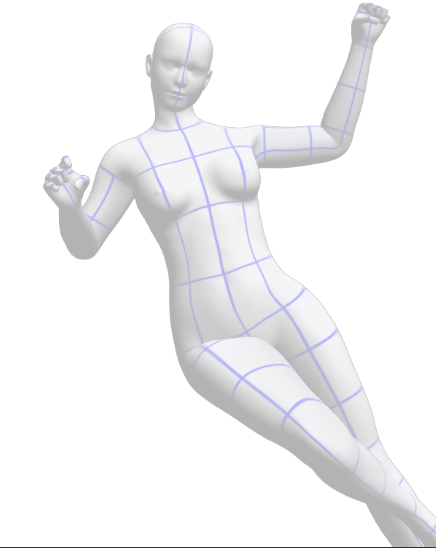
3D models
If you use CSP, you're aware of the poseable 3D models available. I struggle with proportion of bodies in certain perspectives and poses and these models are so valuable to me in pieces like this one. The practice of sketching over models is debated constantly within the art community. If it helps you and your end result doesn't look like what you started with, I don't see an issue. I also believe that you should always attempt the piece without the aid, just to see your improvement. Your hand may have the training to produce the shapes you want and if you don't test it out, you'll never know! These models can be a strong tool for growth for us all but try not to become fully reliant on them. I will also stress that you shouldn't be straight up tracing the lines of these models. Your drawing will only end up looking stiff and lifeless. Use what fundamentals you've learned and utilize the model as a guide, not a hard base. If I use a 3D model, after posing I lock it, setting the layer to 21% opacity and create a new raster layer above the 3d Model for my rough sketch. |
|
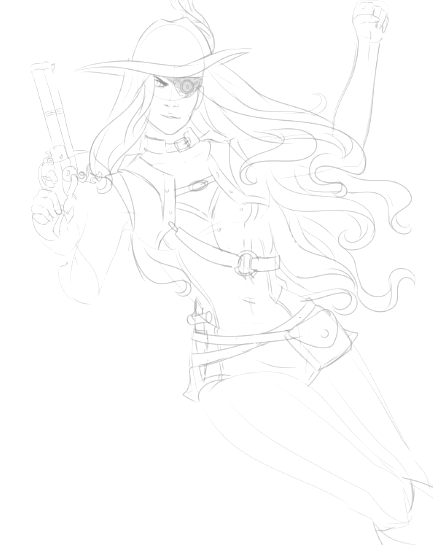
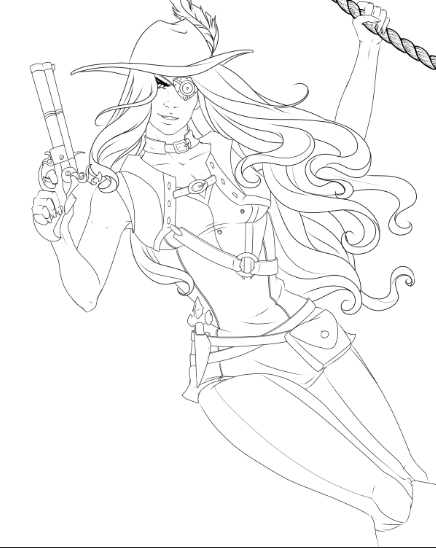
Rough Sketch
Whether using a 3D model or free handing it, sketches are always fun! They're messy, stress-free and where a lot of the magic is born! This step takes me the longest. I spend as much time getting the sketch down as I do lining and coloring combined. When I'm happy with the result and I've verfified the details and received approval from the client, I set the sketch to 21% opacity and above it, create a new vector layer for my lines, which is my absolute favorite step of my process! |
|
Lining
My favorite step! I like to line in vector as it's easy to erase, adjust and resize. I will always recommended any line artist use vector lines. It's so worth it. I use a variety of brushes depending on the feel of the piece, generally tending to use less bold strokes. My lines tend to stay fairly even. Using line weights is an art on its own and something I've not really practiced. It can elevate your work and I'd like to learn more about it and incorporate it into my work eventually. Extra tidbit: One of the best pieces of advice I've received about line work is -not- to connect and define every single line. I struggle with this still after so many years but -eventually- I'll be able to stop connecting every line. *shakes fist* |
|
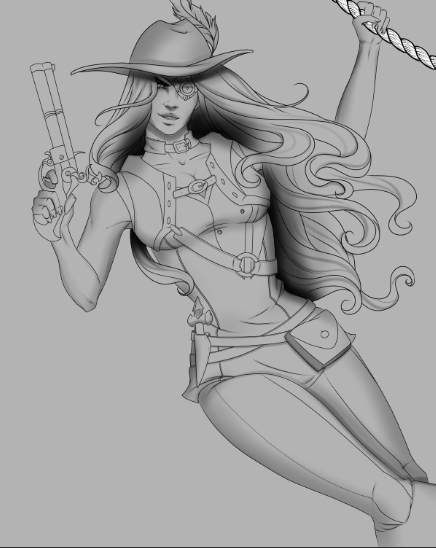
Shading
My second favorite step! I create a raster layer beneath my linework and set it to 'Soft light' mode. I always begin this step in black. I adjust the shade colors after flatting. Cel Shading: I use CSP's 'G-pen' to outline my cel shading and I'll use CSP's 'Bucket' tool to fill it in. Once I cel shade everything, I'll go in with a blender and soften some of the curves. Soft Shading Skin: On the face, I will generally use CSP's 'Colored Pencil' to get a subtle skin texture. This is a good tool for shading any part of the skin. Soft Shading General: I love Frenden's Soft Sylas for soft shading and gradients. |
|
Laying Flats
This is where it all comes to life! I will turn off my shading layer and create a new raster layer beneath it. To save my wrist and save time, I use the 'Bucket' fill tool to lay my flats. CSP has -amazing- settings and creative ways to fill sections of color without leaving unsightly gaps. It's such an amazing program! Not much to say here. Use your references and color away! Adjusting shading colors: After flatting, I'll take the 'Wand' and select sections of color, ie skin, and selecting the shading layer, will use the color wheel to brighten a shade. In this case, I changed her skin shade color from black to a purple-red. |

|
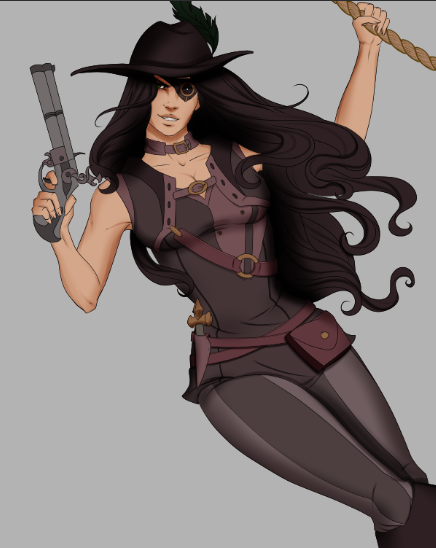
Secondary Palette
Adding this layer is always fun! I add it above the Flats layer and it usually houses make-up, gradients for hair and skin, accessories, etc. Again, not much to say here, just follow those references! |

|
Lighting
I'll add a new raster layer above the Line layer and set it to 'Screen' mode. I choose the flat colors to brighten her palette based on the environment and add shines from a predetermined light source. |
|
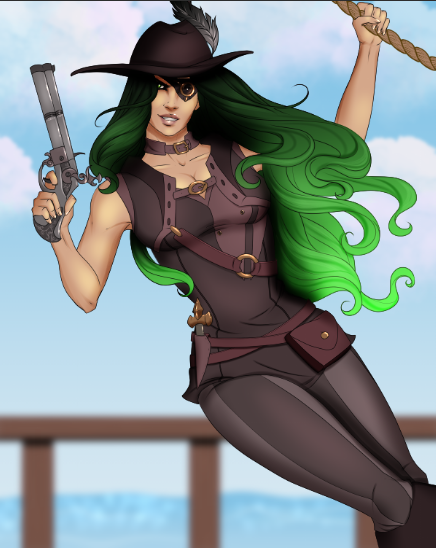
Backgrounds
Bottom-most layer and the base of your illustration. Use whatever floats your boat...teehee. Yeh, I did that, sorry! There are tons of fun brushes others have made that you can download or CSP allows you to make your own. Have fun and experiment here! My only advice on backgrounds is if you rely too heavily on brushes, especially from other artists, your pieces may begin to have a 'manufactured' feel. Try to keep it as organic as possible. Also, using distance blurs and focus tricks can make a piece really interesting! |
|
Sizzle Layer
This layer typically is my top layer and is where I add glows, casting effects, rim lighting....anything fancy to make the piece sizzle! There are so many different modes with different effects for you to play with in CSP. Don't be scared to experiment! And don't forget to sign your piece and be proud of what you create, whether it be for yourself or others! Happy drawing! ~M |
TLDR: Layers from bottom to top; Background, Flats, Secondary Palette, Soft Light Mode Shading, (Vector)Lines, Screen Mode Lighting, Sizzle!
